Data integration is a big part of putting your predictive models to work. ADAPA allows for easy model deployment, but how can you actually move the data to ADAPA for scoring? One simple way is by using SQL Server Integration Services (SSIS) and its Web Service Task.
[High Res Video: SSIS Web Service Task]
Microsoft SQL Server 2008 provides a scalable enterprise data integration platform with exceptional Extract, Transform, Load (ETL) and integration capabilities, enabling organizations to more easily manage data from a wide array of data sources. In this blog, we will show you how to score data in ADAPA by using the SSIS Web Service Task.
In this blog, you will assume that you already familiar with SQL Server Business Intelligence Development Studio. All figures shown in this blog are snapshots from this tool since it is the SSIS environment used to develop integration services.
Once you are able to successfully launch the SQL Server Business Intelligence Development Studio (from noow on referred to in here as SSIS development tool), you should be able to easily create a “New Project” and configure data flow or script tasks to read/write your data (which in SSIS can be from/to a varie…
Data integration is a big part of putting your predictive models to work. ADAPA allows for easy model deployment, but how can you actually move the data to ADAPA for scoring? One simple way is by using SQL Server Integration Services (SSIS) and its Web Service Task.
[High Res Video: SSIS Web Service Task]
Microsoft SQL Server 2008 provides a scalable enterprise data integration platform with exceptional Extract, Transform, Load (ETL) and integration capabilities, enabling organizations to more easily manage data from a wide array of data sources. In this blog, we will show you how to score data in ADAPA by using the SSIS Web Service Task.
In this blog, you will assume that you already familiar with SQL Server Business Intelligence Development Studio. All figures shown in this blog are snapshots from this tool since it is the SSIS environment used to develop integration services.
Once you are able to successfully launch the SQL Server Business Intelligence Development Studio (from now on referred to as SSIS development tool), you should be able to easily create a “New Project” and configure data flow or script tasks to read/write your data (which in SSIS can be from/to a variety of sources/destinations).
For this example, we are interested in scoring Iris data against a neural network model which has previously been uploaded in ADAPA (for more information on the Iris dataset and the Iris Neural Network PMML model used here, please visit our Zementis PMML Examples page).
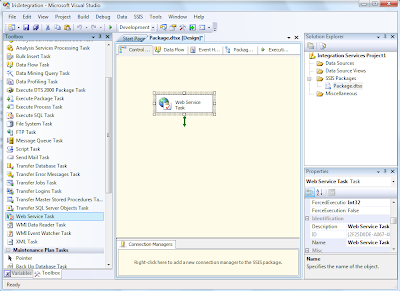
The simplest way for us to achieve this is to set-up a “Web Service Task” in SSIS. By selecting this task from the “Control Flow Items” and dragging it into the main editor, the screen should look like the one shown below. Note that we are not depicting any other SSIS tasks for simplicity reasons.

By double-clicking on the Web Service Task, the SSIS development tool will prompt us with a dialog box asking for the properties used to configure our task. The dialog box is shown below.

So, let’s start by creating a new HTTP connection. Once you select “New Connection” from the drop-down menu, you are faced with a new dialog box.

Note that in this figure, we have already provided SSIS with the URL to the ADAPA WSDL file. The WSDL contains a separate operation for each of your PMML models that have been uploaded in ADAPA. In here, we are using an example URL. You can find a link to the correct URL you will need to use in the bottom of the help page of your ADAPA Instance.
We have also provided SSIS with the appropriate security information for accessing ADAPA which includes name and password. These are the same as the e-mail and password you used to login into the ADAPA Web Console (where you uploaded your predictive models).
Once you are done configuring the connection, click on “Test Connection”. If everything goes as expected, SSIS will give you a message saying that the connection was successful.
Now, it is time to go back to the original dialog box and finish the configuration of the web service task. For the WSDL file, you will need to give SSIS the location of the file itself. You can first create an empty file and enter that as the WSDL file. Then, set “OverwriteWSDLFile” to true, and click on “Donwload WSDL” on the bottom of the dialog box. The SSIS development tool will download the WSDL into the empty file you created.
Given that all “General” properties have been configured, let’s move on to “Input”. The dialog box shown below already displays our selections. Thanks to the WSDL file, SSIS will automatically add “adapaModelsService” to the drop-down menu. The same for Method. All the models you uploaded in ADAPA are available for selection in the drop-down menu. In this example, we are using the Iris_NN model. Once the method is specified, all input variables available are displayed. In this case, we have four: sepal_length, sepal_width, petal_length, and petal_width. Note that we entered values by hand for each of these variables. In most cases, however, input values will come from a database or file and will be dynamically passed to the web service.

Continuing with the configuration of the web service task, let’s now move on to “Output”. In the dialog box shown below, we selected “OutputType” to be a Variable and configure this variable to be “User::WebServiceResponse” (it is very easy to create new variables in the SSIS development tool). Variable “WebServiceResponse” was created to be of type string. This variable will contain the response ADAPA will send back after it executes the Iris_NN model.

Basically, that’s all we need to access ADAPA using SSIS. Once we run our project, we can see the value ADAPA computed by placing a break point on the end of the execution of the web service task. See screen below.

Once we do that and execute the task, we can then take a look at the WebServiceResponse variable. Notice that in the screenshot below, the response we got back from ADAPA was “Iris-versicolor” (look for the variable highlighted in blue).

Accessing ADAPA via the “Web Service Task” is a simple and quick way to integrate your data and models using SSIS. Note, however, that you can choose to use the “Script Task” item to access ADAPA via Web Services. You can also use data flow and script tasks to read/write data from/to a file or database.
For more information on how to configure the Web Service Task and use the response you get back from it, please take a look at the Web Service Training Video from Microsoft.