

Developed by RedHat, OpenShift is an enterprise-grade hybrid cloud Kubernetes platform. It is essentially a commercial version of the open source container orchestration system designed to automate the deployment, management, and scaling of containerized applications.
OpenShift can be described as a hybrid K8s application platform that operates as a platform-as-a-service (PaaS), which means it is a containerization platform. Docker is the open-source image of the containerized applications. OpenShift is the orchestration layer.
OpenShift is mostly similar to Kubernetes, so its operation, workflow, and interface will likely be familiar to those who have already tried using the latter. The process of managing OpenShift secrets with Akeyless Vault is similar to using Akeyless with Kuberenetes as detailed in the OpenShift plugin documentation.
Prerequisite: The OpenShift Plugin
You need to install the OpenShift plugin so you can start using Akeyless Vault with OpenShift. The plugin leverages OpenShift’s Mutating Admission Webhook to capture and augment the annotated pod configuration for secrets injection using init and sidecar containers.
More Read

Plugin installation
Before you can install the plugin, take note of the following requirements:
- Kubeconfig file. Another option is the environment variable KUBECONFIG=<path-to-kubeconfig> – This is used by OC/Kubectl to set context while working with the cluster
- Webhook installation – One installation is needed for each Akeyless account.
Install helm (run from /poc/kubernetes-webhook-akeyless-secrets):
# helm install --namespace akeyless vault-secrets-webhook helm-chart -f ./helm-chart/values.yamlWebhook removal:
# helm delete --namespace akeyless vault-secrets-webhook
Creating pod with secrets:
Creating Secrets
You must create a secret before creating the pods that depend on that secret. When creating secrets:
- Create a secret object with secret data.
- Update the pod’s service account to allow the reference to the secret.
- Create a pod, which consumes the secret as an environment variable or as a file (using a secret volume).
You can use the create command to create a secret object from a JSON or YAML file:
After you create a secret, you can:
Create the pod to reference your secret:
# oc create -f pod.yaml
Get the logs:
# oc logs secret-example-pod
Delete the pod:
# oc delete pod secret-example-pod
Once the plugin is installed, applications can find a secret at a given filesystem path. They no longer need to manage tokens. Also, it is not necessary for apps to link to an external API and employ other mechanisms to interact with a secrets management system. The plugin simplifies the process considerably without compromising system security.
Moreover, with the plugin in place, the sidecar container obtains secrets before an app runs. This is what happens when a web app uses dynamic secrets to connect or log in to a database under an expiring lease.
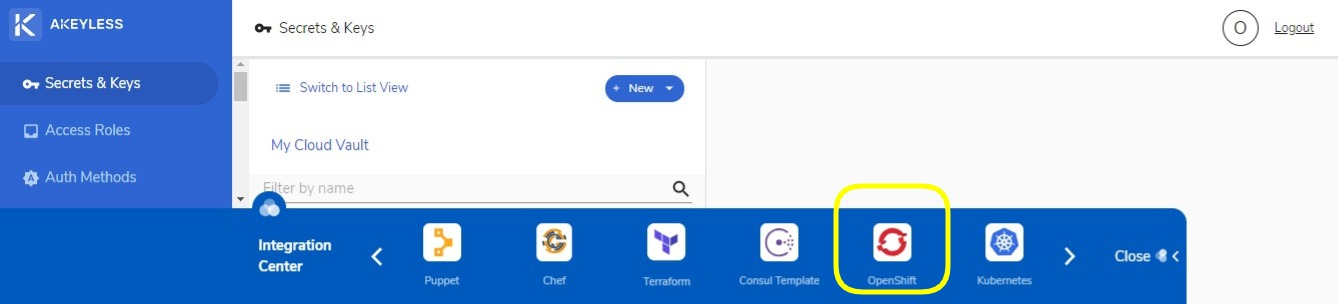
To learn more about the OpenShift plugin, go to the Integration Center bar at the bottom part of the Akeyless WebUI interface. Click on the right-pointing angle bracket (greater than symbol) to find the OpenShift button. Select OpenShift to be directed to the plugin’s how-to guide.
What benefit do you get with using Akeyless with OpenShift?
OpenShift already has its own secrets feature. It can provide a secret object that is used for storing data that should not be made accessible to unauthorized parties. Such data include passwords, usernames, private repository credentials, as well as secret files. The secrets stored in the secret object are encoded in Base64 and are generated and managed independently.
After the secrets are created, they can then be transmitted to a pod as content volumes or environment variables. Secrets may also be referenced from builds. Doing this protects sensitive information that are included in the images from which pods are created, which should not be kept in the images.
The problem with this built-in feature of OpenShift, however, is that the secrets are only encoded, not encrypted. As such, cluster admins can peer into the secrets kept by tenants. Similarly, node administrators can look into the secrets when they are in use. When the secrets are mounted as temporary file-storage facilities (tempfs) in the node responsible for deploying the pod that uses them, nothing stops node administrators from reading the stored secrets. This security flaw can also grant access to an intruder/hacker who has gained remote shell access into the container.
Using Akeyless Vault to manage secrets addresses the aforementioned security shortcomings with OpenShift. Akeyless only generates credentials and other secrets when required. In contrast, OpenShift automatically makes secrets available even when they are not yet needed.
An example
To illustrate the use case described above, consider this example. A user has a WordPress site and a MySQL database that has to be deployed using OpenShift. Conventionally, with OpenShift’s native secrets function, the username and password needed to establish connection for the deployment are obtained from OpenShift secrets.
Recall that OpenShift secrets are not encrypted. They can be viewed by cluster admins and node administrators. To resolve this security problem, the Akeyless OpenShift plugin can be installed, so secrets can be fetched from Akeyless Vault, not from OpenShift.
Managing OpenShift Secrets with Akeyless Vault
As mentioned, OpenShift is very similar to Kubernetes. The process of using Akeyless Vault with Kubernetes is similar to using it with OpenShift except for the installation of the plugin.
After you have installed the OpenShift plugin, you can proceed to creating a secret with Akeyless Vault. To do this, click on the blue New button in the middle part of the Akeyless Vault user interface.
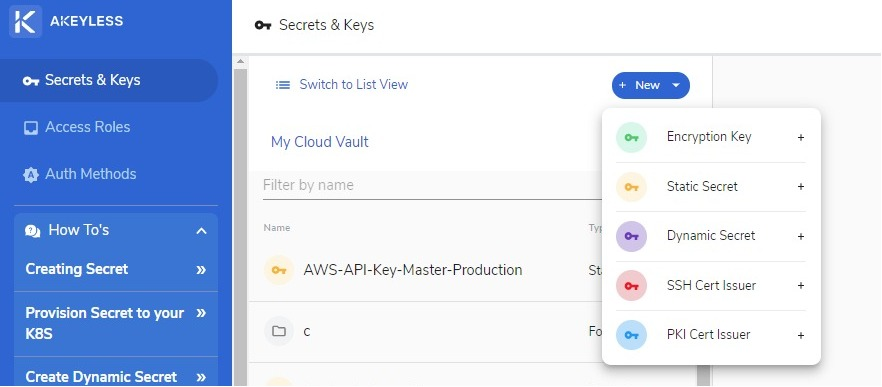
Choose Static Secret and fill out the required fields.
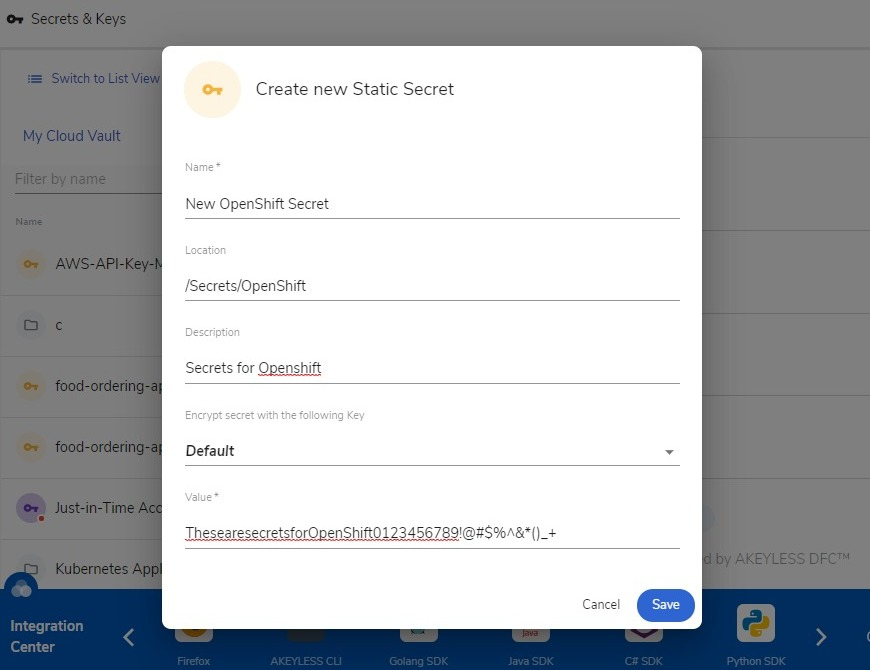
- You can enter whatever you want in the Name field.
- For the Location, it does not have to be a preexisting file path. You can come up with anything logical that will serve as the virtual storage for the new secret you are creating.
- The Description field is optional. Enter anything that will describe the new secret you are storing.
- You also don’t have to do anything with the Encryption field, as the secret will still be encrypted with the default method.
- Lastly, you can enter whatever you like in the compulsory Value field. It can be anything character, from alphabets to symbols as well as spaces.
Note: New secrets should be added to the yaml describing pod (pod.yaml and pod2.yaml in the example above) for them to be injected to the container. If a new secret is added to a pod has already been deployed, the new secret will not be fetched. Akeyless Vault does not support the automatic updating and discovery of newly added secrets to a pod. The pod needs to be redeployed by deleting the pod or by using the following command:
# oc apply -f pod.yaml
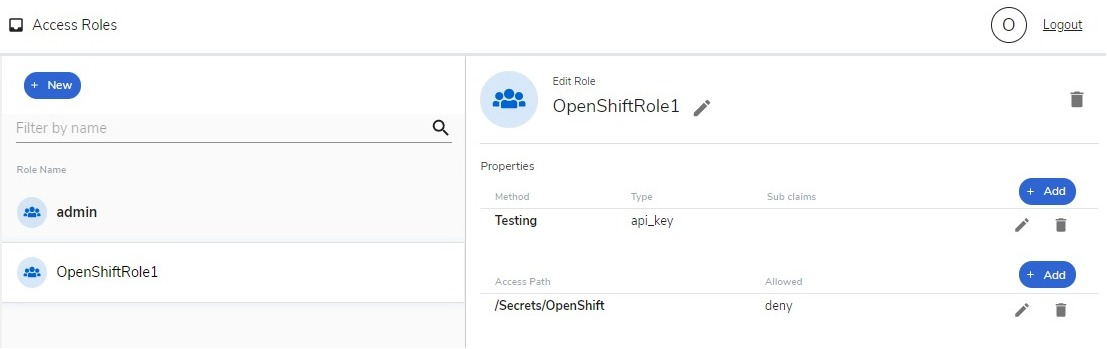
After you have created the secret, you can proceed to specifying who will have access to the secret. To do this, you need to create a Role. Find the Access Roles option on the left sidebar and click on it. Then, click the New button to create a role.
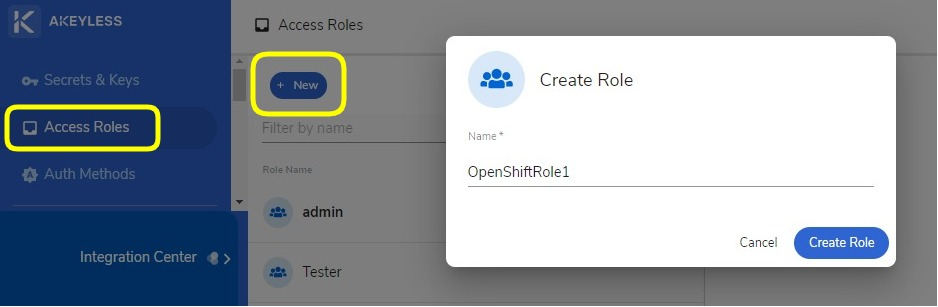
The role creation does not stop with clicking of the Create Role button on the Create Role modal window as shown above. Once the Role has been created, you have to configure it. Specify the Authorization Method and Access Path for the specific role.
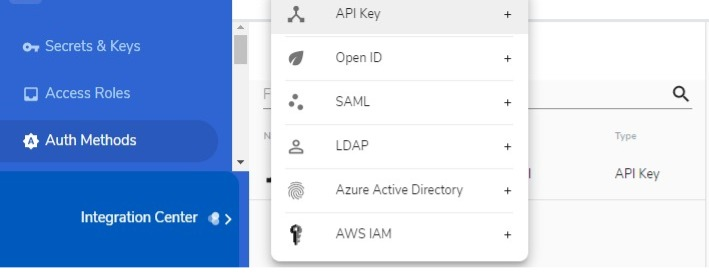
If you have not created an authorization method, go to the left sidebar and click on the Auth Methods option. The authorization method lets you set an authority requirement that can be an API key, Open ID, SAML (i.e. Okta), LDAP, Azure Active Directory, or AWS IAM.
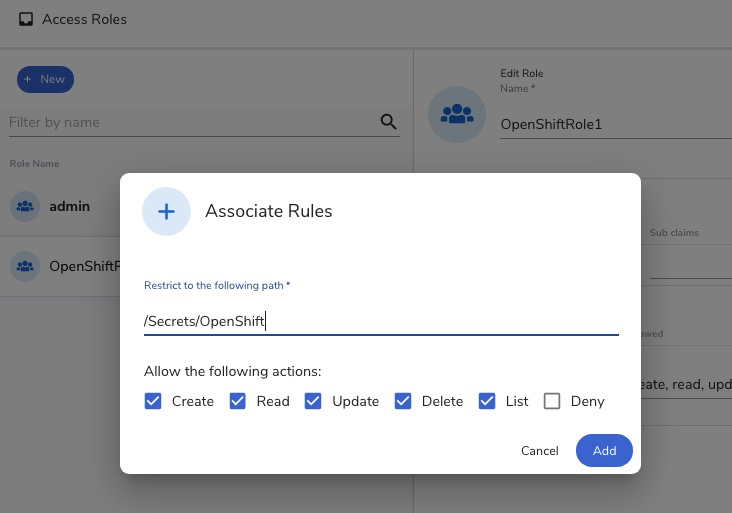
The Access Path configuration, on the other hand, is about specifying what you want a Role to do with the indicated Location (virtual file location path) you entered when you created a secret. You can allow a Role to do any or all of the following: Create, Read, Update, Delete, List, Deny. If you enter “/Secrets”, for example, and tick “Read,” the Role grants a user access to all secrets contained in the virtual /Secrets folder. If you enter “/Secrets/OpenShift”, only the secrets contained in the OpenShift subfolder of the Secrets folder become accessible.
Akeyless Vault’s intuitive interface makes it easy to manage OpenShift secrets. And it does it with the benefit of enhanced security. You can be assured that your secrets are safe and inaccessible to third parties. Try using Akeyless Vault to experience the benefits yourself. You can also count on the platform’s comprehensive documentation and Online Support feature to assist you in case you encounter problems.


