
Azure Data Lake Storage Gen2 is based on Azure Blob storage and offers a suite of big data analytics features. It is rapidly becoming the primary choice for companies and developers due to its superior performance. If you don’t understand the concept, you might want to check out our previous article on the difference between data lakes and data warehouses.
- 1. Determine your preparedness
- 2. Get ready to migrate
- Identify the data sets that you’ll migrate
- Determine the impact of migration
- Create a migration plan
- Lift and shift pattern
- This is the most basic pattern.
- Incremental copy pattern
- Dual pipeline pattern
- Bi-directional sync pattern
- 3. Migrate data, workloads, and applications
- 4. Switch from Gen1 to Gen2
Data Lake Storage Gen2 combines the file system semantics, directory, file-level security, and scale of Azure Data Lake Storage Gen1 with the low-cost, tiered storage, and high availability/disaster recovery capabilities of Azure Blob storage.
In this article, I will walk you through the process of migrating your data to data lakes.
1. Determine your preparedness
Before anything, you need to learn about the Data Lake Storage Gen2 solution, including its features, prices, and overall design. Compare and contrast the capabilities of Gen1 with those of Gen2. You also want to get an idea of the benefits of data lakes.
More Read

Examine a list of known issues to identify any gaps in functionality. Blob storage features like diagnostic logging, access levels, and blob storage lifecycle management policies are supported by Gen2. Check the current level of support if you want to use any of these features. Examine the current level of Azure ecosystem support to ensure that any services on which your solutions rely are supported by Gen2.
What are the differences between Gen1 and Gen2?
Data organization
Gen 1 provides hierarchical namespaces with file and folder support. Gen 2 provides all of this as well as container security and support.
Authorization
Gen 1 uses ACLs for data authorization, while Gen 2 uses ACLs and Azure RBAC for data authorization.
Authentication
Gen 1 supports data authentication with Azure Active Directory (Azure AD) managed identity and service principles, whereas Gen 2 supports data authentication with Azure AD managed identity, service principles, and shared access key.
These are the major differences between Gen 1 and Gen 2. Having understood these feature diffrenciations, if you feel the need to move your data from Gen 1 to Gen 2, simply follow the methods as mentioned below.
2. Get ready to migrate
Identify the data sets that you’ll migrate
Take advantage of this chance to purge data sets that are no longer in use and migrate the particular data you need or want in the future. Unless you want to transfer all of your data at once, now is the time to identify logical categories of data that may be migrated in stages.
Perform aging analysis (or equivalent) on your Gen1 account to determine whether files or folders need to remain in inventory for an extended period of time or are they becoming outdated.
Determine the impact of migration
Consider, for example, if you can afford any downtime during the relocation. Such factors might assist you in identifying a good migration pattern and selecting the best tools for the process.
Create a migration plan
We can choose one of these patterns, combine them together, or design a custom pattern of our own.
Lift and shift pattern
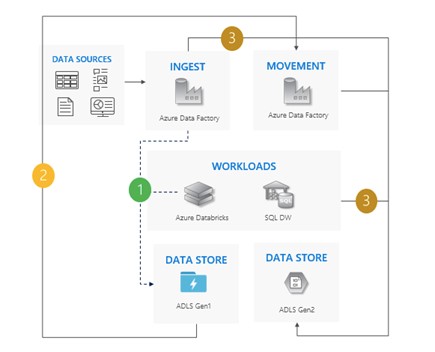
This is the most basic pattern.
In it, first and foremost, all Gen1 writes need to be halted. Then, the data is transferred from Gen1 to Gen2 via the Azure Data Factory or the Azure Portal, whichever is preferred. ACLs are copied along with the data. All input activities and workloads are sent to Gen2. Finally, Gen1 is deactivated.
Incremental copy pattern
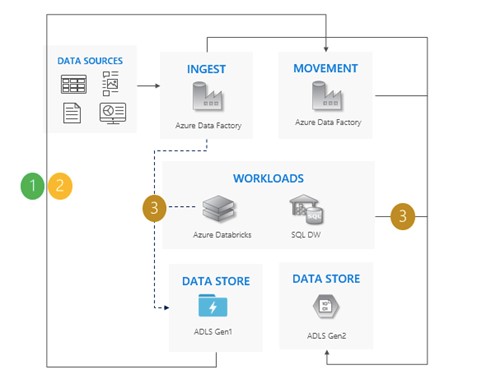
In this pattern, you start migrating data from Gen1 to Gen2 (Azure Data Factory is highly recommended for this pattern of migration). ACLs are copied along with the data. Then, you can start copying new data from Gen1 in stages. When all the data has been transferred, stop all writes to Gen1 and redirect all workloads to Gen2. Finally, Gen1 is destroyed.
Dual pipeline pattern
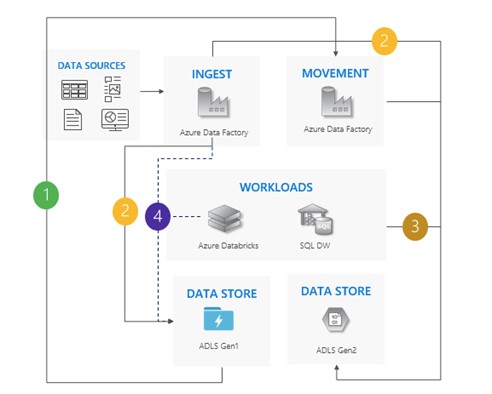
In this pattern, you start migrating data from Gen1 to Gen2 (Azure Data Factory is highly recommended for dual pipeline migration). ACLs are copied along with the data. Then, you incorporate new data into both Gen1 and Gen2. When all data has been transferred, stop all writes to Gen1 and redirect all workloads to Gen2. Finally, Gen1 is destroyed.
Bi-directional sync pattern
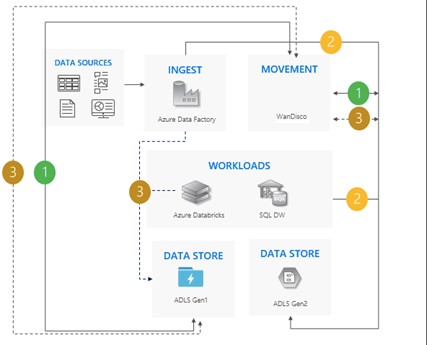
Set up bi-directional replication between Gen1 and Gen2 (WanDisco is highly recommended for bi-directional sync migration). For existing data, it has a data repair feature. Now, stop all writes to Gen1 and switch off bi-directional replication once all movements have been completed. Finally, Gen1 is exterminated.
3. Migrate data, workloads, and applications
Migrate data, workloads, and applications using the preferred pattern. We propose that you test cases in small steps.
To begin, create a storage account and enable the hierarchical namespace functionality. Then, move your data. You can also configure the services of your workloads to point to your Gen2 endpoint.
4. Switch from Gen1 to Gen2
When you’re certain that your apps and workloads can rely on Gen2, you may start leveraging Gen2 to meet your business requirements. Decommission your Gen1 account and turn off any remaining pipes that are running on it.
You can also migrate your data through the Azure portal.
Conclusion
While switching from Gen1 to gen2 might seem like a complex and daunting task, it brings with it a host of improvements in features that you will greatly benefit from in the long run. Keep in mind that the key question when it comes to implementing this shift is asking yourself how you can leverage Gen2 to suit your business requirements.
I hope in this article you get a clear explanation of how to migrate your data to data lake storage.


